Page 6 of 17
Re: Building a replacement MTX PSU
Posted: 12 Jun 2015 23:42
by wyerd
Great pics Mark. My bits and pieces have started to arrive so I'm itching to start! Just need to find some hook up wire of various colours which is harder than you'd think over here.
Re: Building a replacement MTX PSU
Posted: 18 Jun 2015 19:43
by wyerd
Mark,
Can you help me out with the transformer please as I'm not sure how to wire it up? Also, how did you mount it in the box?
Thank you,
David


Re: Building a replacement MTX PSU
Posted: 18 Jun 2015 23:20
by 1024MAK
Details in next post below...
But first, do you have a multimeter?
Measure the resistance (Ohms, 200 ohm range) of each of the primary windings.
So the first winding is between the connections labelled 1 and 2. The second winding is between the connections labelled 5 and 6. The resistance should be about the same.
Mark
Re: Building a replacement MTX PSU
Posted: 20 Jun 2015 23:04
by 1024MAK
wyerd wrote:Can you help me out with the transformer please as I'm not sure how to wire it up? Also, how did you mount it in the box?
I used two M4 countersunk machine screws, two washers, and two nuts to fix the transformer to the case via two 4mm holes I drilled in the case. Before drilling the holes and before wiring up, place the transformer in the case to ensure it fits, and also check that the lid will go on

Then (assuming the test fit above was okay) mark where you want the holes drilling by using a sharp point. Then drill the holes... (see also pictures further up this thread).
Ensure you do the resistance check in the post above. Then...
Transformer wiring:
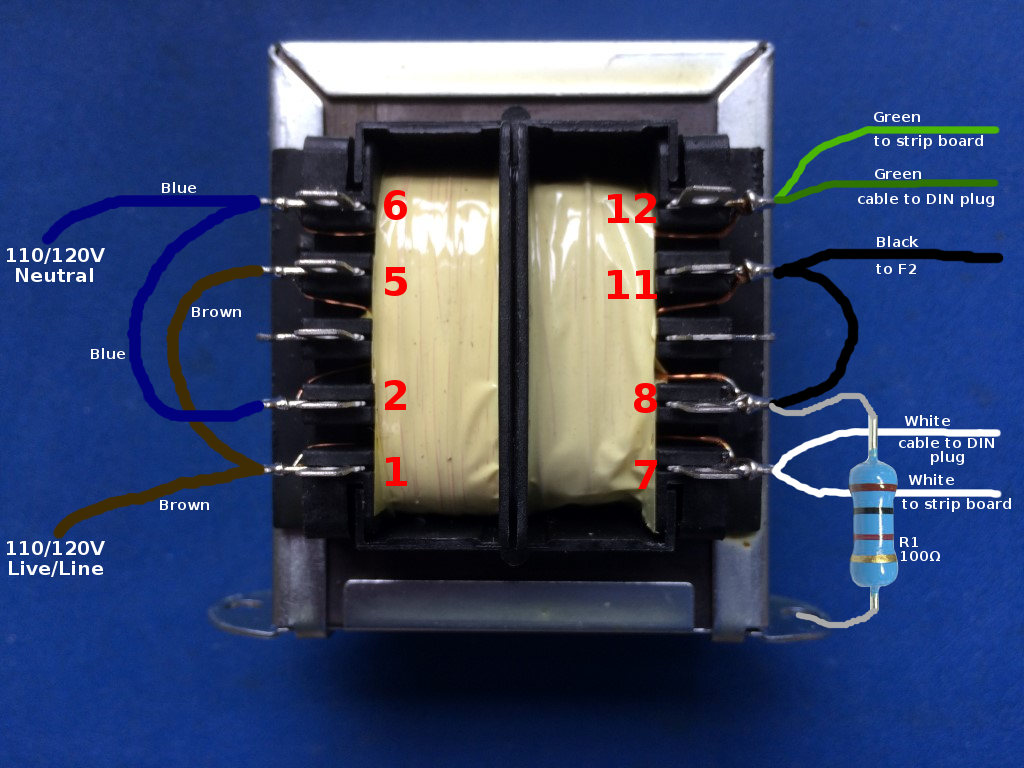
- USA transformer wiring.PNG (649.75 KiB) Viewed 13859 times
Note, connect the wiring to the tag provided (this not shown in the picture for clarity) by gently twisting the stripped copper strands, threading through the hole, and then bending the wire back to form a "U" or hook shape. This improves the mechanical strength of the connection. Once soldered, cover with heatshrink

The resistor connects to the casing of the transformer at one of the mounting holes by using a "solder tag". Also not shown, at the same point where the resistor connects to the transformer case, a green (or green/yellow) earth wire should be connected, again by using a "solder tag". Ensure that the transformer case where these "solder tags" are connected is clean and free of any varnish or other non-conductive protective coating by scrapping at the metal with a screwdriver. We need a really good connection. Put the machine screw through the case, put the transformer over it, then put the two solder tags (with the resistor and the green wire already attached) on the screw, then add a washer and finally the nut.
Once you have the mains wiring finished and the fuse fitted in the IEC connector, measure the resistance between the Live/Line (L) and the Neutral(N) connections at the mains plug, or the IEC connections. It should be about half of the value you got for one winding that you took earlier.
Mark
Re: Building a replacement MTX PSU
Posted: 21 Jun 2015 00:35
by wyerd
Thank you Mark. Much appreciated.
Just been cutting the switch and power connector holes out from the box. You're quite correct about the mess it makes! Best thing to to is make the mess when the other half is out and make sure it's cleared up before she's back. She'll never know then!!
Re: Building a replacement MTX PSU
Posted: 21 Jun 2015 00:39
by wyerd
Yes, I do have a digital multimeter. I'll check the resistances.
Re: Building a replacement MTX PSU
Posted: 23 Jun 2015 21:45
by wyerd
1024MAK wrote:Details in next post below...
But first, do you have a multimeter?
Measure the resistance (Ohms, 200 ohm range) of each of the primary windings.
So the first winding is between the connections labelled 1 and 2. The second winding is between the connections labelled 5 and 6. The resistance should be about the same.
Mark
1 and 2 is 27.1 Ohms
3 and 6 is 32.5 Ohms
Is that OK?
Re: Building a replacement MTX PSU
Posted: 23 Jun 2015 22:03
by 1024MAK
wyerd wrote:1 and 2 is 27.1 Ohms
3 and 6 is 32.5 Ohms
Is that OK?
Assuming you mean:
5 and 6 is 32.5 Ohms
Yes
.
Because the wire for one winding is slightly longer than the other, there is normally a slight difference.
Once you have wired up the wiring to the primary (input) of the transformer, measure the resistance between Live/Line and Neutral. It should be about 14 or 15 ohms. If it is at or near this value, it is a good sign that the transformer primary windings are wired in parallel.
One other IMPORTANT thing while I am thinking about it. Keep the mains wiring at least 6mm (1/4 inch) (preferably a greater distance) away from the low voltage wiring and components. Where possible, restrain or secure the wiring so that mains wires cannot touch low voltage wiring and components even if a connection breaks. Same for low voltage wiring. Try to use heatshrink or other insulating sleeve to insulate any exposed terminals (not always possible, I know).
Good luck with your construction
Mark
Re: Building a replacement MTX PSU
Posted: 23 Jun 2015 22:11
by wyerd
1024MAK wrote:wyerd wrote:1 and 2 is 27.1 Ohms
3 and 6 is 32.5 Ohms
Is that OK?
Assuming you mean:
5 and 6 is 32.5 Ohms
Yes
.
Because the wire for one winding is slightly longer than the other, there is normally a slight difference.
Once you have wired up the wiring to the primary (input) of the transformer, measure the resistance between Live/Line and Neutral. It should be about 14 or 15 ohms. If it is at or near this value, it is a good sign that the transformer primary windings are wired in parallel.
One other IMPORTANT thing while I am thinking about it. Keep the mains wiring at least 6mm (1/4 inch) (preferably a greater distance) away from the low voltage wiring and components. Where possible, restrain or secure the wiring so that mains wires cannot touch low voltage wiring and components even if a connection breaks. Same for low voltage wiring. Try to use heatshrink or other insulating sleeve to insulate any exposed terminals (not always possible, I know).
Good luck with your construction
Mark
Oops! Yes, 5 and 6.
I have the same box you used, so I'm constructing it the same way as you, or at least attempting.
Re: Building a replacement MTX PSU
Posted: 23 Jun 2015 22:21
by 1024MAK
Well, if you want any specific additional pictures (I still have a small number left that I have not yet processed and uploaded), or indeed help and advice, just say so
Mark